A dull knife is one of the most frustrating tools in the kitchen — and one of the most dangerous. When your blade won’t slice through a tomato or slides off a carrot instead of cutting it, you’re working harder than you should be. More pressure means less control, and less control means accidents.
Learning how to sharpen a knife solves all of that. And it’s simpler than most people expect.
This guide walks you through everything you need to know: the difference between sharpening and honing, which tools to use, step-by-step sharpening methods for both beginners and enthusiasts, and how to keep your knives sharp long-term. Whether you’ve never sharpened a blade in your life or you’ve tried and weren’t happy with the results, this is the guide to start with.
Sharpening vs. Honing: Know the Difference First
These two terms get confused constantly, and mixing them up leads to knives that never quite get sharp enough.
Sharpening removes a small amount of steel from the blade and physically reshapes the edge. When a knife dulls, the edge bends, rolls, or wears down. Sharpening grinds away that damaged metal and creates a fresh, acute “V” profile along the blade.
Honing realigns the edge you already have. It doesn’t remove meaningful amounts of metal. Instead, a honing rod straightens micro-bends in the blade that develop with regular use. Think of it as maintenance between sharpenings.
The practical rule: hone your knife every few uses. Sharpen it when honing stops helping.
How Do You Know When a Knife Needs Sharpening?
A few reliable tests tell you when it’s time to sharpen rather than just hone.
The paper test: Hold a sheet of printer paper at the top edge and slice downward. A sharp knife cuts cleanly. A dull one tears, catches, or folds the paper.
The tomato test: Press the blade lightly against a ripe tomato. A sharp knife bites in without pressure. A dull knife slides across the skin.
The thumbnail test: Gently rest the blade edge against your thumbnail at a slight angle. A sharp knife catches immediately. A dull one slides off without gripping.
If any of these tests reveals a struggling blade, sharpen it — honing alone won’t fix it.
What Dulls a Knife the Fastest?
Before picking up a sharpening tool, it helps to know what’s working against your edge in the first place.
The biggest culprits are:
- Glass and ceramic cutting boards — these are extremely hard and grind away the edge with every cut
- Putting knives in the dishwasher — the heat, vibration, and harsh detergents damage the steel and the handle
- Storing knives loose in a drawer — blades knock against other utensils and roll the edge
- Cutting on stone, marble, or metal surfaces — even brief contact degrades the edge quickly
- Chopping through bone or frozen food — this chips or rolls the edge faster than anything else
Switching to a wood or plastic cutting board and storing your knives on a magnetic strip or in a knife block makes a measurable difference in how long they stay sharp.
The Right Tools for Sharpening a Knife
You don’t need a large collection. The right tool depends on how dull your knife is and how sharp you want it to get.
Pull-Through Sharpeners
Pull-through sharpeners are affordable, compact, and easy to use. You place the heel of the blade in the slot and pull it toward you in a smooth motion. Pre-set abrasive wheels — usually ceramic or carbide — grind the edge as the blade passes through.
They’re a decent choice for quickly refreshing a dull kitchen knife. The downside: they remove more metal than necessary and offer limited control over the final edge. For high-quality knives, they’re not the best long-term option.
What Is a 4 Stage Knife Sharpener?
A 4 stage knife sharpener includes four sequential sharpening slots, each with a different level of abrasiveness or function. A typical four-stage setup looks like this:
- Coarse grinding (diamond or carbide) — repairs very dull or damaged edges
- Medium grinding (coarse ceramic) — shapes and refines the edge geometry
- Fine grinding (fine ceramic) — smooths and sharpens the edge
- Honing or stropping (smooth ceramic or felt) — aligns and polishes the final edge
The four-stage design gives you more control than a basic two-slot sharpener and can handle knives in various conditions without switching tools.
Whetstones (Sharpening Stones)
Whetstones give the best results of any sharpening method. With practice, you can get a blade sharper than it was when it left the factory. They require a bit more technique, but the process is genuinely learnable in one session.
Whetstones are rated by grit, which describes how abrasive the surface is:
- 200–400 grit: Coarse. Used for repairing heavily damaged or very dull edges.
- 800–1200 grit: Medium. The workhorse range for most sharpening sessions.
- 3000–5000 grit: Fine. Refines and polishes the edge.
- 6000+ grit: Ultra-fine. Used for a razor-sharp finish, primarily on high-end Japanese knives.
For most home cooks, a two-stone setup — 400 grit and 1000 grit — handles the majority of situations.
Honing Rod
A honing rod (also called a sharpening steel) maintains the edge between sessions. Steel rods are the most common; ceramic rods are gentler; diamond rods are more aggressive and can remove small amounts of metal.
What Is the Correct Way to Sharpen a Knife?
The correct technique depends on the tool you’re using, but the underlying principle is the same: maintain a consistent angle and work systematically from heel to tip on both sides of the blade.
What Is the Correct Order of Sharpening Steps?
Following the right order matters. Here’s the full sharpening sequence, whether you’re using a stone or a pull-through sharpener:
- Assess the blade — determine how dull it is and choose your starting grit or stage
- Set up your workspace — secure the stone or sharpener on a stable surface
- Start with the coarse stage — reshape the edge on the dull or damaged side
- Work both sides evenly — match the number of strokes on each side to avoid uneven grinding
- Move to the finer stage — refine and smooth the edge geometry
- Hone the blade — align the final edge with a honing rod or leather strop
- Test for sharpness — use the paper test or tomato test to confirm results
- Rinse the blade — remove any metal filings before using the knife
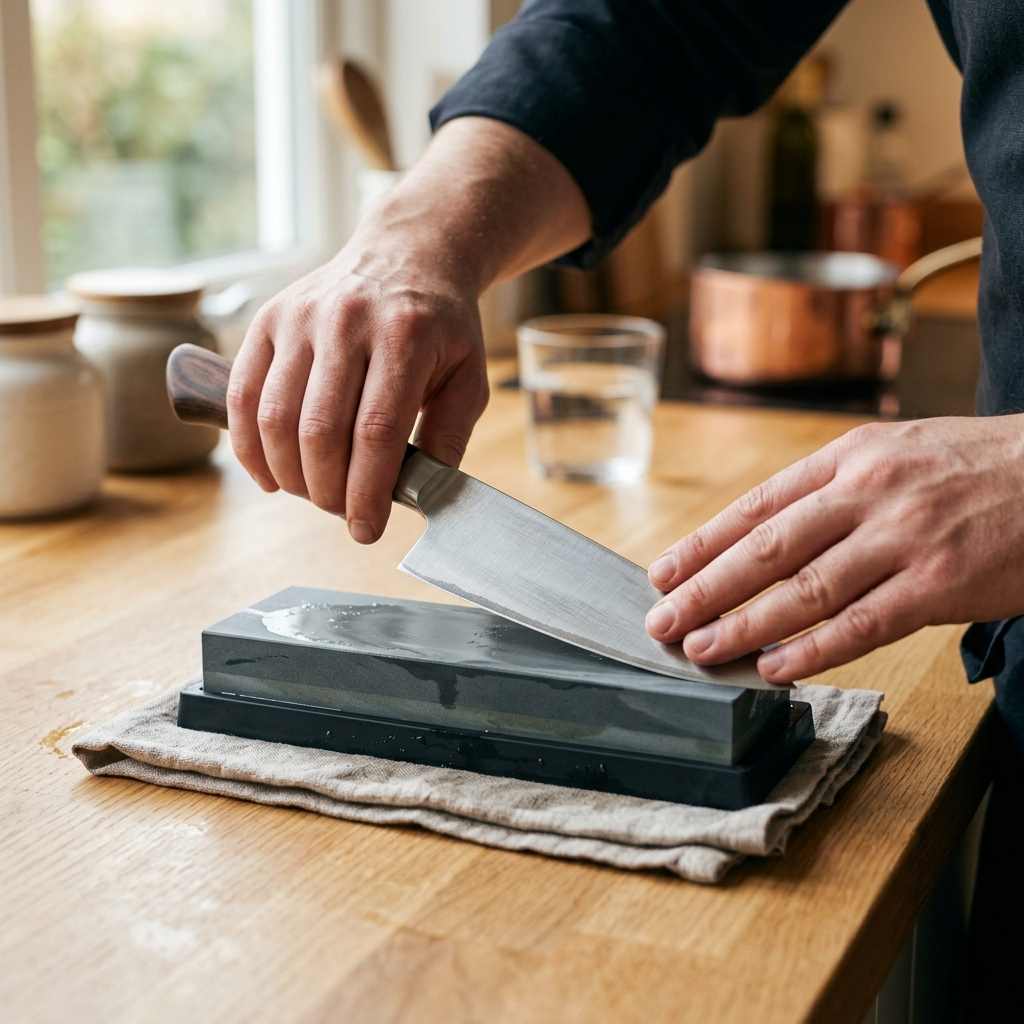
Step-by-Step: How to Sharpen a Knife with a Whetstone
This is the method that produces the best results. Take it slow your first time — consistency matters more than speed.
Step 1: Soak or Splash the Stone
If you have a soaking stone, submerge it in water for about five minutes before use. If you have a splash-and-go stone, just wet the surface and add water as needed throughout sharpening.
Step 2: Choose Your Angle
Hold the knife at a 15–20 degree angle to the stone. For most Western-style knives, 20 degrees works well. For Japanese knives with thinner blades, aim for 15 degrees. Not sure what that looks like? Lay the blade flat on the stone (0 degrees) and raise the spine about the width of two stacked quarters — that’s roughly 15–20 degrees.
Step 3: Start on the Coarse Side
Place the tip of the blade at the far end of the stone. Push the knife forward and across the stone simultaneously — heel to tip in one smooth arc — as if you’re trying to slice a thin layer off the stone’s surface. Maintain your angle throughout the stroke.
Use light, even pressure. Let the stone do the work.
Step 4: Work Both Sides
Complete 8–12 strokes on one side, then flip the knife and repeat on the other side. You’re looking for a consistent scratch pattern along the edge and, eventually, a small “burr” — a thin flap of steel that forms on the opposite side of the edge. The burr tells you you’ve sharpened enough on that side.
Step 5: Move to the Fine Stone
Switch to your medium or fine grit stone (800–1200 grit) and repeat the process. This refines the scratch marks left by the coarse stone and polishes the edge. Use lighter pressure here.
Step 6: Hone and Strop
Finish with a honing rod or leather strop to remove the burr and align the apex of the edge. Run the blade down the rod at the same 15–20 degree angle, alternating sides with each stroke.
Step-by-Step: How to Sharpen a Knife with a Pull-Through Sharpener
This method is faster and requires less technique, making it practical for everyday kitchen knives.
- Place the sharpener on a flat, stable surface and grip it firmly
- Insert the heel of the blade into the coarsest slot
- Pull the knife toward you using light downward pressure — let the wheels do the grinding
- Complete 3–5 pulls through the coarse slot
- Move to the next slot (medium or fine) and repeat with lighter pressure
- Finish in the final slot, which typically hones or polishes the edge
- Rinse the blade and test for sharpness
One important note: match the sharpener to your knife type when possible. Sharpeners pre-set at a 20-degree angle won’t give ideal results on Japanese blades designed for 15 degrees.
Common Mistakes to Avoid
Even simple sharpening can go wrong in predictable ways. Watch out for these:
- Changing your angle mid-stroke — this creates an inconsistent bevel and a weaker edge
- Using too much pressure — aggressive grinding removes more steel than necessary without improving sharpness
- Skipping the honing step — the burr left after sharpening dulls the edge immediately if not removed
- Sharpening too infrequently — waiting until a knife is extremely dull means removing a lot of metal each time, which shortens the blade’s lifespan
- Using a glass cutting board — you’ll undo your sharpening in one session
How to Maintain Your Knife’s Edge Between Sharpenings
Sharpening restores an edge. Good habits protect it.
- Hone before or after each use with a honing rod — two or three light passes per side
- Use a wood or plastic cutting board exclusively
- Hand wash and dry your knives rather than using the dishwasher
- Store them safely on a magnetic strip, in a knife block, or with blade guards
- Never scrape food off the cutting board with the blade edge — use the spine instead
With consistent maintenance, most home cooks only need to sharpen their knives two to four times per year.
Frequently Asked Questions
What is the correct way to sharpen a knife?
The correct way is to hold the blade at a consistent 15–20 degree angle against an abrasive surface (usually a whetstone or pull-through sharpener), work both sides of the blade evenly, and finish with a honing rod or strop to remove the burr. Consistency of angle matters more than any other single factor.
What is a 4 stage knife sharpener?
A 4 stage knife sharpener is a pull-through device with four sequential slots: coarse grinding to repair dull edges, medium grinding to shape the edge, fine grinding to sharpen it, and a finishing stage that hones or polishes. It covers the full sharpening process in one compact tool.
What dulls a knife the fastest?
Glass and ceramic cutting boards are the top culprits, followed by dishwasher cleaning, improper storage (loose in a drawer), and cutting through bone or frozen food. Switching to a wood cutting board and storing knives properly extends the time between sharpenings significantly.
What is the correct order of sharpening steps?
Assess the edge, set up your station, grind on the coarse stage, work both sides evenly, move to a finer stage, hone the blade, then test for sharpness. Always finish with honing — sharpening without honing leaves a burr that dulls the edge immediately.
How often should I sharpen my knives?
Most home cooks benefit from sharpening two to four times per year, depending on use. If you hone regularly, you can extend those intervals comfortably. A knife that sees daily use may need more frequent sharpening than one used occasionally.
Do I need an expensive whetstone to get good results?
No. A mid-range 1000 grit whetstone from a reputable brand (Shapton, Naniwa, King) will produce excellent results. Expensive stones are refinements — they’re worth it if you develop a passion for sharpening, but they’re not necessary to get a razor-sharp kitchen knife.
Wrapping Up
Sharpening a knife well comes down to three things: the right tool for the job, a consistent angle, and following the correct order of steps. You don’t need to master every technique at once. Start with a basic whetstone or a quality pull-through sharpener, practice the motion, and add honing into your weekly routine.
Your knives will feel completely different — and so will your time in the kitchen. Once you can slice a tomato paper-thin with zero effort, it’s hard to go back. Pick your tool, follow the steps above, and start sharp.